
User Guide
Permission and user administration
Users in C1 CMS can have diverse permissions. The administrator can, for example, choose that only some users should be granted the permission to approve and publish content to the website.
The administrator grants permissions to users via user groups.
There are both global and local permission in the system. Global permissions are assigned on the user and user group settings in the System perspective under “Users and Permissions”. A global permission is an assigned permission valid in all the navigation perspectives that the user has been given access to individually or via a user group. Local permissions are granted in the Content and other perspectives and cover only permissions to single pages and other elements respectively.
User administration is placed in the System perspective under “Users and Permissions”.
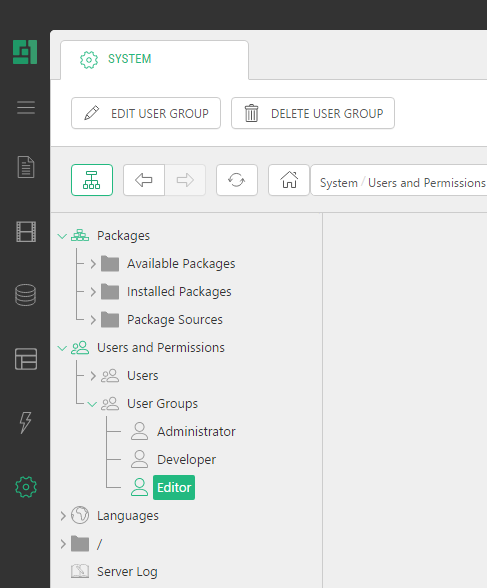
Figure 73: Users and Permissions in the System perspective
Here, new users and user groups can be created and permissions assigned. This can only by performed by users with the “Administrate” permission.
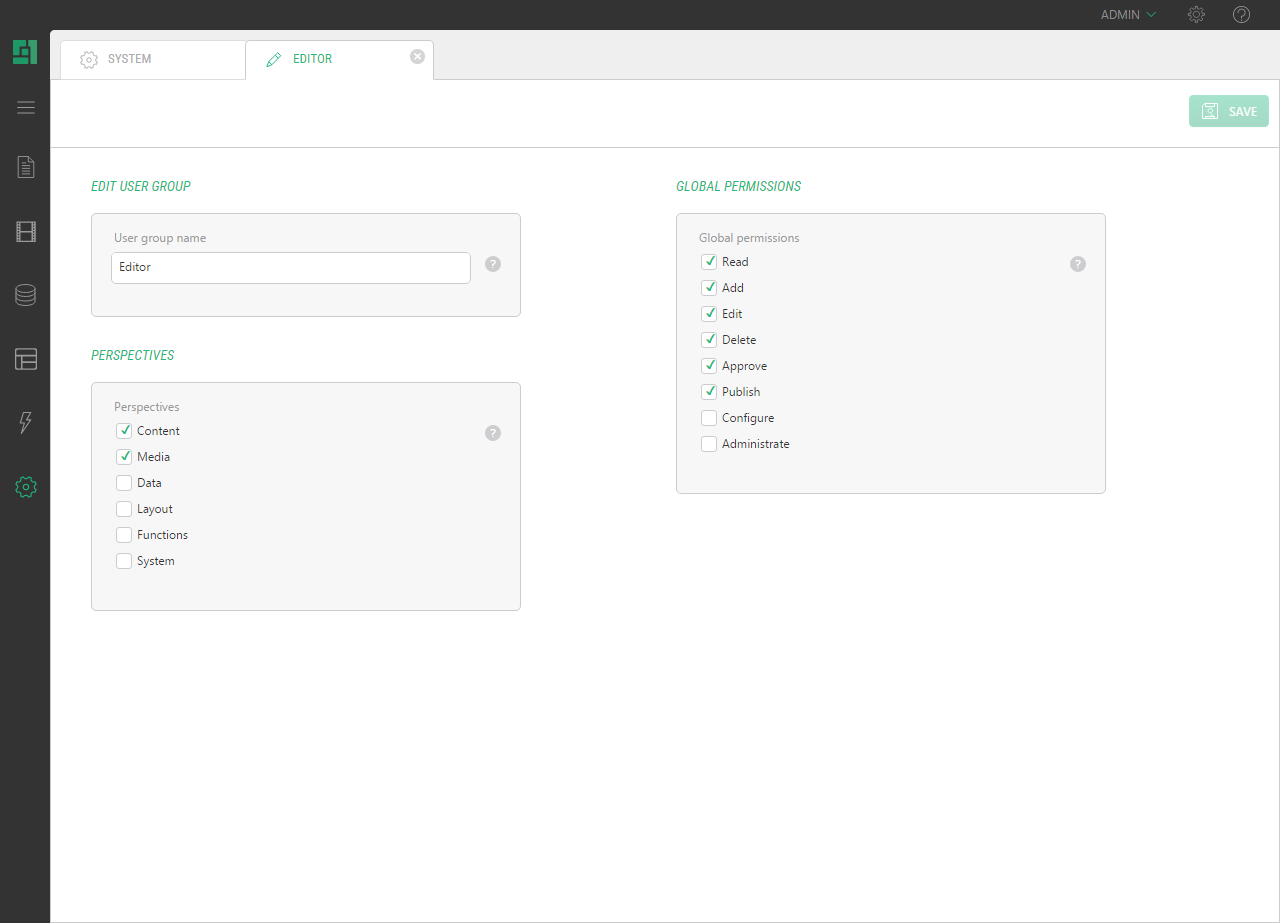
Figure 74: Editing a user group
It is important that you distinguish between the perspectives the user has access to and the permissions the user has in those perspectives, that is, what actions the user is allowed to perform.
The permissions for actions are assigned only in user groups. That is why the user must be a member of at least one user group.
Access to the perspectives can be assigned both at a single-user level and a user-group level. Hence, the access to the perspectives is a combination of the accesses granted both to the user and to the groups the user belongs to.
For example, if the user group has been granted access to the Content perspective and assigned the Add permissions, all the users who belong to this group will have access to the Content perspective and be able to add pages in this perspective. Besides, if one of the users in this group has been individually assigned access to the Layout perspective, this user will additionally be able to add templates in the Layout perspective.
If the user has not been assigned to any user group, he or she will not be able to view the content of the perspectives this user has been individually assigned.
We recommend that you take the steps in user administration in the following order:
- Create user groups.
- Grant these groups access to the navigation perspectives (if necessary) and assign global permissions.
- Create users.
- Grant these users access to the navigation perspectives (if necessary).
- Assign these users to user groups with required permissions and access.
If necessary, you can also assign local permissions for users and groups in corresponding perspectives.
The “administrate” permission is required to create and administrate user groups in the system.
How to create a new user group:
- In the System perspective under “Users and Permissions”, select User Groups.
- Click Add User Group on the toolbar. A dialog box will appear.
Figure 75: Adding a user group
- Specify the name for the user group and click OK.
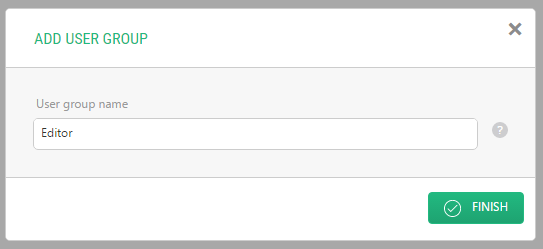
The new user group has been created and can now be assigned the necessary permissions.
Assign global permissions to the user group
When you have created a user group, you will be able to assign the necessary permissions to the user group. These permissions can be changed later by selecting the user group in the tree structure and clicking Edit User Group.
How to assign global permissions:
- Under Perspectives, choose which navigation perspectives all the users in this group should have access to.
- Under Global permissions, choose which global permissions the users in this group should have.
- Save the changes.
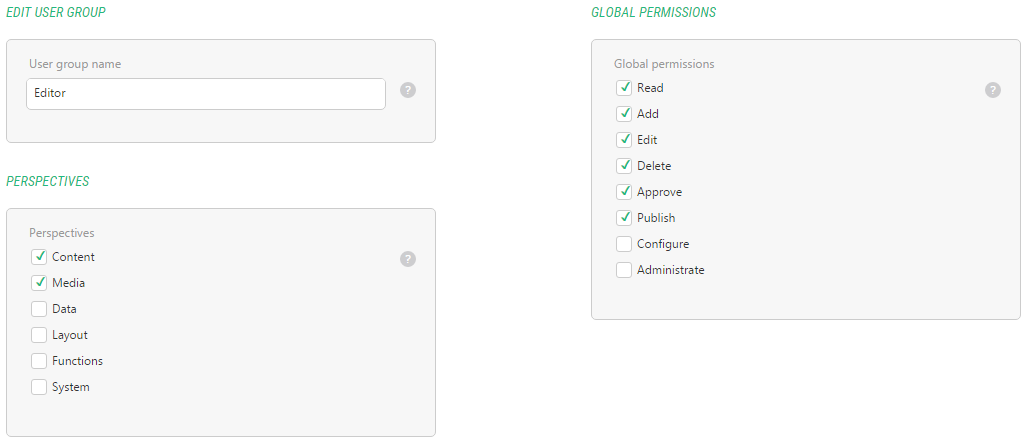
Figure 76: Setting global permissions on a user group
Note: Selecting navigation perspectives for user groups can be optional if you intend to grant users access to specific perspectives individually. However, selecting the perspectives in user groups is preferable if you manage many users who would share access to the same perspectives with the same permissions.
Global permissions | |
Add | Grants the user the permission to add new elements. |
Edit | Grants the user the permission to edit elements. |
Delete | Grants the user the permission to delete elements. |
Read | Grants the user the permission to view elements. |
Approve | Grants the user the permission to approve pages or data. |
Publish | Grants the user the permission to publish pages or data. |
Configure | Grants the user the permissions to add websites, add, edit, delete meta fields and data folders to pages, install and uninstall packages. |
Administrate | Grants the user the permission to add and administrate users and user groups in C1 CMS as well as all the "Configure" permissions. |
The “Administrate” permission is required to create and administrate users in the system.
How to create a new user:
- In the System perspective under “Users and Permissions”, click Add User on the toolbar. A dialog box will appear.
- Fill out the fields and click OK.
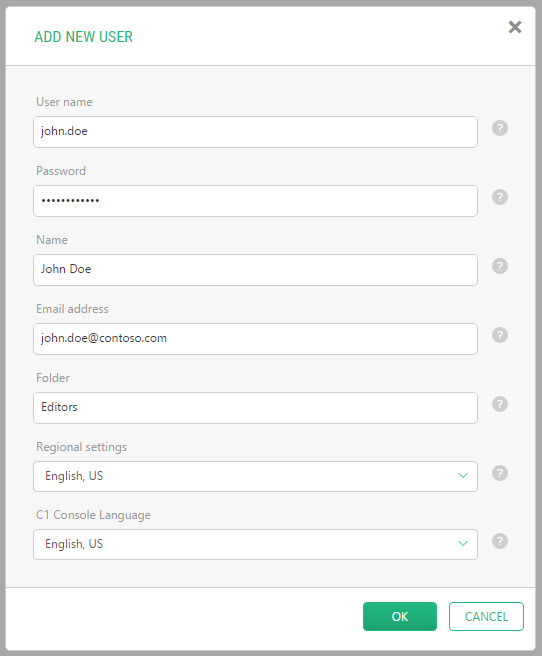
Figure 77: Adding a user
The new user has been created.
Field description | |
User name | Enter the name to be used for login. |
Password | Enter the desired password. (The password must be at least 6 characters long.) |
Name | Enter the name of the person to use this account. |
Email address | Enter the email address of this user. |
Folder | Enter the name of the folder you wish the user should belong to. If you type in a folder name that does not exist, a new folder will be created |
Regional settings | Choose a regional setting. The user will be shown numbers, times and dates in the format commonly used in the selected country. |
CMS Console Language | Choose the language of the CMS Console. The user will be shown the CMS Console in this language. |
Assign global permissions to the user
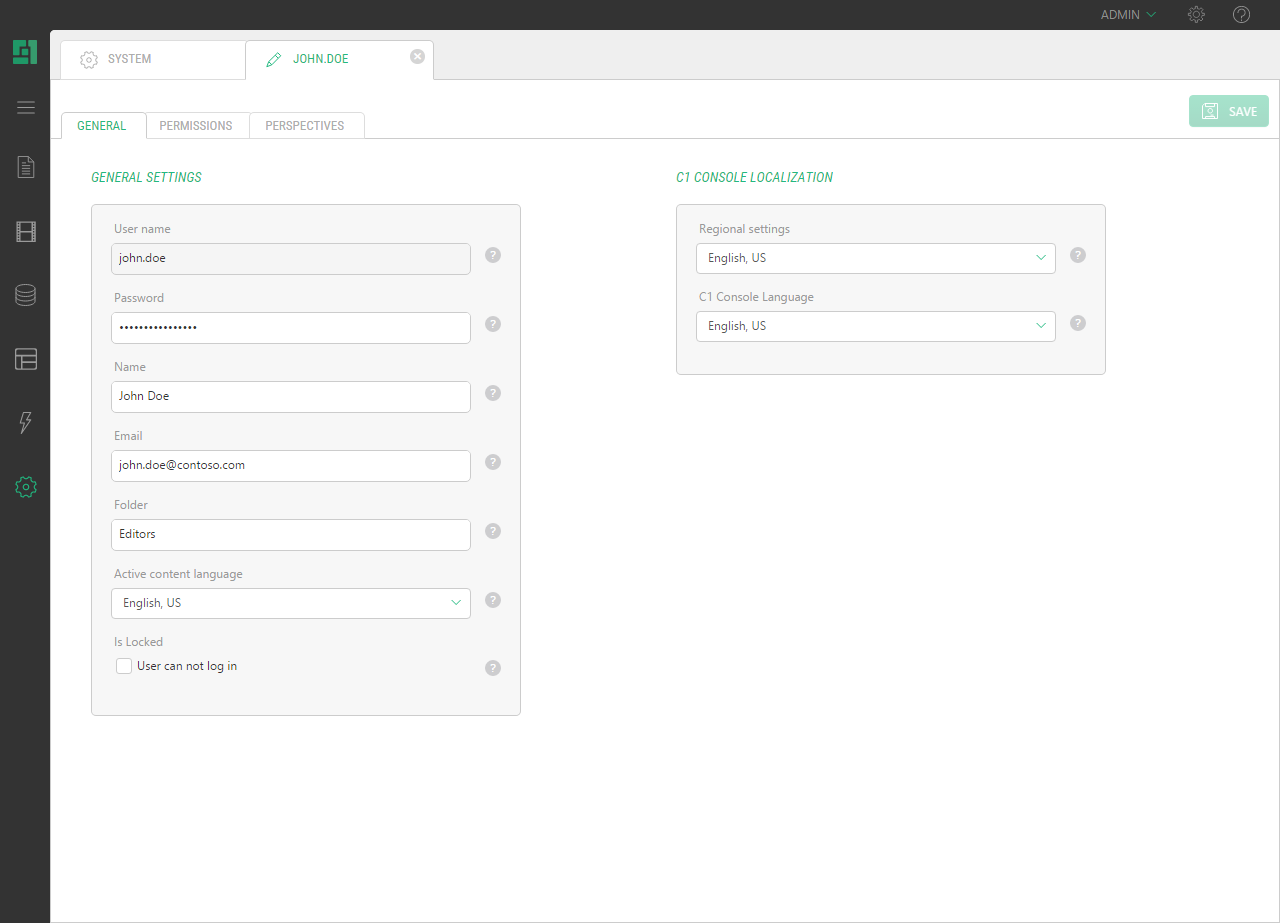
When you have created a user, you will be able to grant the user access to the perspectives, website’s data language, regional settings and CMS Console language individually. These permissions can be changed later by selecting the user in the tree structure and clicking Edit User.
How to assign global permissions to the user:
- On the General tab under CMS Console Localization, select the regional settings (the way numbers, dates etc are formatted in data fields) and the language of the CMS Console (if other languages are installed).
Figure 78: CMS Console Localization settings
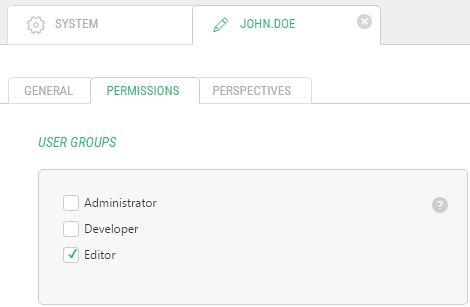
- On the Permissions tab:
- under User Groups, choose what user group(s) the user should be assigned to (see "Assigning Users to Groups" for more information),
Figure 79: Assigning a user to user groups
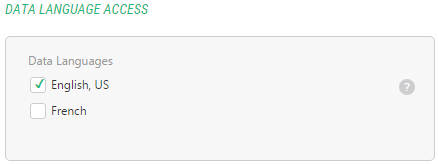
- and under Data language access, choose which languages the user should have access to on the website in.
Figure 80: Data language access settings
- under User Groups, choose what user group(s) the user should be assigned to (see "Assigning Users to Groups" for more information),
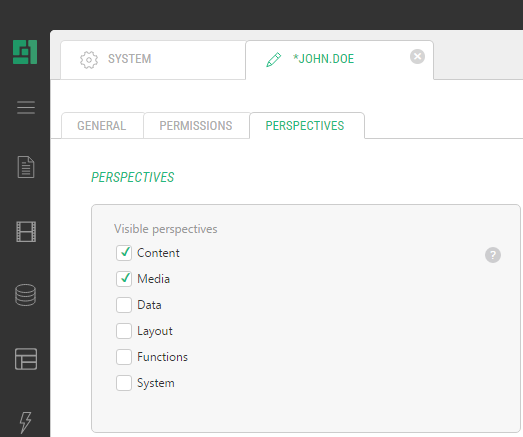
- On the Perspectives tab, choose which perspectives should be visible to the user.
Figure 81: Granting a user access to perspectives
- Save the changes.
Note: Access to the navigation perspectives is a combination of the accesses granted to the user and the user groups this user belongs to.
To allow users to work within navigation perspectives, you need to assign the users to the user groups that have the proper permissions.
For example, if you want a user to be able to add, edit and delete pages in the Content perspective, you should assign this user to the user group that has Add, Edit and Delete permissions within the Content perspective.
Alternatively, you can grant this user access to the Content perspective individually and then assign the user to the group that has Add, Edit and Delete permissions without any specific perspective assigned.
How to assign users to user groups:
- In the System perspective under “Users and Permissions”, click the user you want to assign to user groups and click Edit User on the toolbar. The user settings form will open.
- On the Permissions tab under User Groups, select the user groups.
- Save the settings.
Figure 82: Assigning a user to a user group
The user group permissions and access settings are now applied to this specific user.
Permissions can be also assigned on elements within the navigation perspectives locally. For example, you can assign local permissions on pages in the Content perspective. Local permissions can be assigned for both users and user groups.
How to assign local permissions:
- In the Content perspective, right click the page you want to assign permissions to and click Edit Permissions on the toolbar. A list of all users and a list of use groups will appear on two tabs.
Figure 83: Editing local permissions
- On the User Groups tab, select the user groups you want to assign permissions to by selecting the checkbox next to the user group name.
- Apply or remove permissions by clicking the green check marks.
- If necessary, click the User tab, and repeat Steps 2 and 3 for users.
- Save the settings.
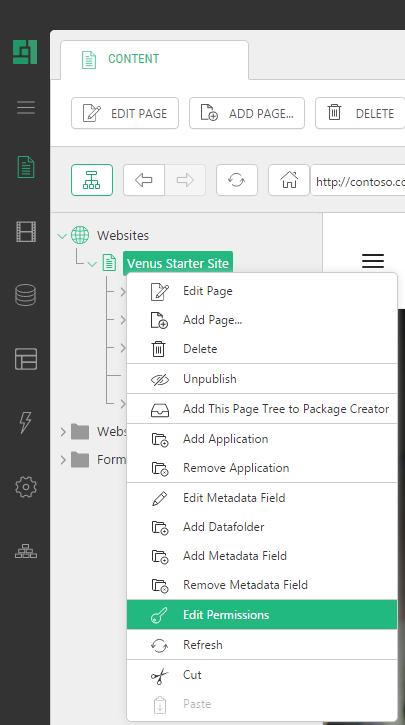
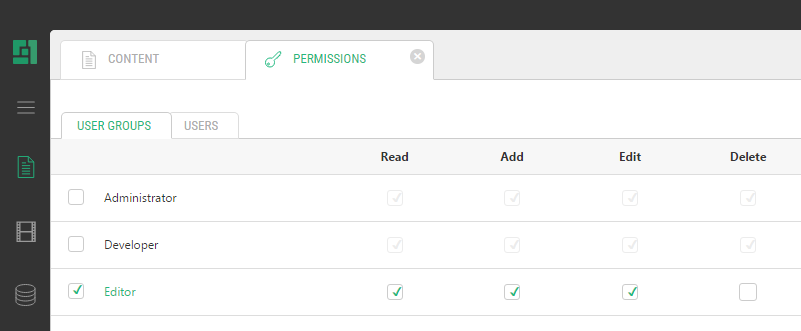
Figure 84: Setting local permissions on a user
The permissions are now applied to this specific page and all subpages.
Tasks: “Permission and user administration”
- Create a user group “Readers”.
- Grant the user group access to the Content and Media perspectives.
- Assign the user group the permission to view.
- Create a user with the username “user” and password “123456”.
- Assign the user to the “Readers” user group.
- Close the administrative console and log on with the new user’s credentials.
- Make sure that the new user cannot edit pages.
- Log on as the administrator again.
- Assign the “Readers” user group the permissions to edit, add and delete.
- Close the administrative console and log on with the new user’s credentials.
- Make sure that the new user can edit and add new pages.